Organic Crock Pot Pulled Pork

Hello!  I am still here! University is so time consuming, I have had to prioritize extra curricular activities and unfortunately, blogging (and even most new recipe creating) had to be benched. Looks like my last post was in December which was around my last school break. At this time I am only in two Summer courses which is allowing me to visit some of my pre-student activities.  Yesterday I spend a whole evening in the kitchen.  So great.  I have missed this.

The post I have for you today might seem a little off from my usual as I tend to not eat a lot of meat but, I think it has a place for most of us and if I am going to eat meat then you know its going to be the healthiest version. And, creating healthier versions of classic recipes IS my thing!

wpid-2015-05-15-10.13.56.jpg.jpegPulled Pork. So delicious.  But, so many things can be wrong with this food. For one, Pigs are generally not a well raised animal and often one of the first meats health advisers suggest you omit.  I stopped eating it years ago and I guess just got used to it not being part of my diet.  Except, now, my butcher offers Locally Raised Organic Free-Range No-Hormone Pork. I checked it out, it is legit, these pudgy pink guys get a homemade organic diet including alfalfa (so they even eat their greens) and then get turned out to roam free and play little little piggies should do.

As for ingredients, I use only the best organic spices, coconut sugar and apple cider vinegar. When the meat is done I use the liquid to make the bbq sauce. So easy and unbelievably delicious.  I serve it up with a chili-lime coleslaw and avocado filled rye bun or, in taco with lots of cilantro.  The only thing of note with regards to cooking is I think it depends on your crock pot. Most people say about 8 hours for pulled pork but I start mine on low for about 4 hours then turn it down to warm for about 20 more. Just leave it in there until it falls apart.  If you want some extra bbq sauce that goes well with it I use Simply Natural Organic Barbecue Sauce which is made up of pretty much the same flavoring and of course all natural and organic.

Large Crock Pot
Cast Iron Fry Pan
3-5     lb Pork Shoulder
3         tablespoons High Heat Oil (Grapeseed, Sunflower or Avocado)

3         tablespoons Hot Paprika
3         tablespoons Coconut Sugar
2         tablespoons Mineral or Kosher salt
1          tablespoon Garlic Powder
1          tablespoon Onion powder
1          teaspoon Mustard Powder
1          teaspoon Cumin Powder
2          teaspoons Fresh Ground Black Pepper
1/2      teaspoon Cayenne Pepper

2 3/4  cups Water
3           tablespoons Tomato Paste
1/2       cup Apple Cider Vinegar
1/4       cup Honey

In a medium size bowl, combine all of the spices and coconut sugar then rub on Pork

Heat Oil in cast iron pan then brown all sides of the Pork

Deglaze pan with 3/4 cup of water and then add to crock pot with another 2 cups of water, tomato paste, vinegar, honey and all leftover spices

Place browned pork into crock pot and spoon some of the sauce over it.

Cook on low for 8 to 24 hours, at least until the meat is tender enough to be easily shredded with a fork.

When finished, pour the sauce into a pot on the stove top and simmer to reduced to a thicker bbq sauce

Serve with coleslaw and crusty buns.

*Can be frozen

Sprouted Buckwheat Granola with Cinnamon, Dates and Maple

Happy New Year Food Book Followers! Hope you all had a nice break and got lots of time with loved ones. I had a wonderful last couple weeks of 2014 and am looking forward to what 2015 brings. Only one more day and I will be back to my reality of crazy busyness.  Unfortunately I will continue to likely be too busy to create much of anything new and post between now and April but, I do have a few new recipes from the past few months jotted down to share and will do my best to get them out.

wpid-20141208_171530.jpg
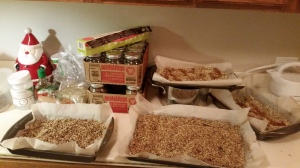
Each year I have created  healthier versions of holiday baking classics and posted but this year, with my time limitations and being in the midst of exams until mid December, I had to do something a little different.  I actually didn’t do ANY  baking this holiday – gasp!  I did however make massive quantities of my sprouted buckwheat granola and jarred that for my friends and family.

wpid-20141206_230925.jpg
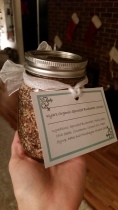
I have meant to post this simple recipe for a while now, the main reason I haven’t is because I never measure what I put into it.  Now, I am giving you measurements but I encourage you to splash, sprinkle and pinch to your own liking rather than just following the recipe. I prefer my granola lightly sweetened, for the purposes of gifting and this recipe I made it a bit sweeter.  Its nothing like you’d find in a store bought version as far as sweetness goes so if you prefer little sweetness too the measurement I provide is probably sufficient. You can always adjust if you wish on your next batch.

To sprout buckwheat, or any grain for that matter, all you do is soak, rinse and repeat until the grain cracks.  With buckwheat this usually takes about 3 days.  If you look closely you will be able to see some tiny sprouting tails. Buckwheat groats give off a really goopyness while soaking, just keep it covered with fresh water on your counter for 3 or so days, rinsing it and covering with new water each day.   When it is done soaking and just sprouting, rinse well and strain well.  Sprouting is so great.  The health benefits are numerous, it can turn a hard-to-digest whole buckwheat kernel into a light, nutrient-dense whole grain. All grains contain certain anti-nutrients inherent in the seed. These anti-nutrients preserve the seed until it has a chance to germinate and grow. By soaking and sprouting you reduce anti-nutrients and make the grain more readily available and digestible.  That’s all I’m going to write about sprouting benefits right now, if you are looking for more, Google has it covered. But whatever you do, DO NOT skip this part for this recipe!  Oh yes, and use raw buckwheat groats, toasted will not sprout, and, use all organic, quality ingredients!

wpid-20141208_171541.jpgThis recipe is dehydrated in the oven, I have posted before about using your oven for dehydrating.  If your oven sets as low then you are good to go at about 150 degrees, just set it and keep an eye on the dryness over the next couple days.  If your oven only goes as low as 170 or so degrees as my current oven does, it is still totally doable, just use a metal spoon or utensil to keep the door cracked open which allows moisture and extra heat to escape.  This recipe usually takes about 48 hours to dry out.  If you do a double batch, (which I often do) it might take longer but just keep an eye on it.

2       large baking sheets lined with parchment paper
6       cups Sprouted Buckwheat Groats (about 4 cups pre-soaking)
1        cup Hemp Seeds
1        cup Chia Seeds
1/2   cup Dates, chopped
1/4   cup Cinnamon
1/4   cup Maple Syrup
3-4   tablespoons Coconut Oil, melted
1        teaspoon Himalayan Mineral Salt

Combine buckwheat, melted oil, maple, cinnamon, and sea salt then divide on two parchment paper lined baking sheets to dehydrate in your oven for 24 to 48 hours. (I love cinnamon and always sprinkle extra on top before putting into the oven).  When done drying combine with the hemp and chia seeds and chopped dates.

Wild Mushroom Soup – Dairy Free

wpid-wp-1424227428484.jpegI’m excited to share this recipe with you; I haven’t been coming up with much in the soup recipe department lately simply because I have so many great ones already that we rotate through regularly. I have however been meaning to work out a healthier version of the classic creamy mushroom soup and, in lieu of a bit of a mushroom kick I’ve been on lately, I finally have one to share!  This soup is so easy to prepare, you can use any mix of mushrooms you like and the creamy base is from cauliflower not cream.  Super healthy, very tasty and easy to prepare – perfect right?   As for the mushroom kick, I’m still feeling it, planning on going on a little wild mushroom picking course soon too so I’m sure another post-able mushroom recipe or two will come about.

Large heavy bottom soup pot
Butter and/or Oil
5          cups of water and broth
2          medium heads of Cauliflower, stemmed, broken into pieces
3          cloves Garlic, crushed
1          large Sweet Onion, chopped
2          teaspoons Onion Powder
2          tablespoons, fresh Thyme
6          cups mixed fresh Wild Mushrooms, (chanterelles, girolles, trompettes de mort, shiitake, oyster ect), clean, coarsely chopped
1          small bunch fresh Parsley, chopped
1          lemon, juiced
Sea Salt and Ground Pepper to taste
Truffle Oil *optional but worth it
Italian Mascarpone Cheese or Greek Goat Yogurt *optional

First step to this recipe is to boil the cauliflower, place the broken up pieces into your pot then add 2-3 cups of water, enough to just cover the cauliflower then boil with a lid on until the cauliflower is well cooked and very mushy.  Transfer to a blender or food processor and blend well.  Set aside.

In a fry pan, heat butter or oil and fry up the mushrooms with a little sea salt until they are browned.  Add chopped parsley, toss and set aside.

Rinse out the soup pot and return to the stove to medium-high heat, add some oil or butter and then sauté the garlic, onions and thyme until the onions are translucent.

Add onion powder, your broth (approximately one liter), the creamy cauliflower base and 1/3 to 1/2 of the sautéed mushroom mix, stir to combine and heat for 5 minutes to incorporate.

Return the soup to your blender or processor and blend until smooth.  At this point you can add a cup or two more water or broth to adjust thickness.

Return to pot, adjust sea salt and pepper, and add lemon juice.

To serve, ladle into bowls, pile some of your sautéed mushrooms on top and drizzle with truffle oil.

If dairy is not an issue for you it is nice to add a dollop of Mascarpone cheese or even a scoop of Greek Goat Yogurt but again, this is totally optional.

I also served this with a piece of crusty bread……so delicious.

Enjoy!

Creamy Roasted Garlic Soup

FallMarketFirst day of Fall is upon us and that usually means a shift in energy, mood, activities, clothing and food.  In my home we are well on our way transitioning out from Summer BBQ’d salmon, grilled veggies and salads to meals of soup, stew and chilli.  I’ve been keeping this blog collection of my recipes for a few years now and the trend I’ve noticed is that I don’t post as much in the Summer months, in part that is because I eat really simple foods which don’t require much creative planning but, it’s also because I’m outside enjoying the beautiful weather.  There is something about the darker months that invokes a need to nest, thus, moving my creative side indoors to the kitchen.

229654779_9d8cb7d3c6So far we have had a few Fall meals that are staples for me and already posted here but, I have one new soup that I just created to share:  Creamy Roasted Garlic Soup, which was inspired by a little bout of the cough and sniffles that I really didn’t want to let turn into a full blown cold and garlic, is well known for its healing, immune boosting properties.  Conveniently, my neighborhood corner grocery store often has a great selection of local and organic produce and has brought in a huge lot of beautiful looking organic garlic bulbs that, I not only bought a large bag of but, used to plant in my garden too!

roasted garlic 028This recipes is quick and easy to make aside from the process of roasting and then peeling 60 cloves of garlic, I’m not going to go into too much detail on that today, basically I just roasted, allowed to cool enough so I could handle the cloves and then hand squeezed as much as I could out of the skins, nothing too complicated but, Google I’m sure, can offer some good methods for roasting and extracting garlic.  My only request is that you use an Organic Garlic and suggest you go with a larger bulb simply for ease. Also, of note, I used Goat Butter and Yogurt here but it’s perfectly fine if you want to use  Cow Butter and Sour Cream if that’s what you prefer but do go organic.   I served this soup with some home-made rye croutons and it was a huge hit.  In case you’re wondering, I beat that looming cold in a matter of days with healthy foods, sleep, lots of lemon water, tea and a quality Vitamin C/Vitamin D/Probiotic.  Hopefully you all have a happy healthy Fall!

Now for the recipe…..

Creamy Roasted Garlic Soup
Oven 350 degrees
Medium heavy bottomed soup pot
Food processor or blender
60          Organic Garlic Cloves (approximately 6 to 10 bulbs depending)
2-3         tablespoons Organic Butter  or Coconut Oil (I use Goat Butter)
2             large Sweet White Onions, diced
3             tablespoons fresh Thyme, chopped
2             cup Organic Broth
1              Bay Leaf
Bunch   Italian Parsley stems removed, chopped
Sea Salt and White Pepper
3/4         cup Greek Goat Yogurt

First step is to roast your garlic bulbs, this can be done in advance or if you’re super pressed for time, Whole foods sells roasted garlic cloves in oil at their self-serve pesto/olive bar.  I have not tried their garlic but I do trust the quality.  I roast garlic at 350 degrees, tops chopped off, drizzled in olive oil and wrapped in tin foil and just watch for doneness but again, Google is a good source for accurate methods here.   Once you’ve got your roasted garlic ready to go you can start….

Sweat the onions in the butter on medium-high heat for 5-10 minutes being careful not to burn.  Add fresh thyme and roasted garlic then sauté for a few more minutes, stirring to incorporate.

Add broth and bay leaf and bring to a boil.  Reduce and simmer for 10 minutes or until the mixture has reduced just a little.

Remove bay leaf.

Transfer to blender or food processor and add parsley.  Blend till smooth.  Add Yogurt, pulse some more and return to pot.

Season with sea salt and pepper.

Serve with your favourite crusty bread or croutons.

GF Pumpkin Millet Muffins with Cranberries

wpid-2014-08-31-10.17.00.jpg.jpegHere is my new healthier version of a very Fall favourite muffin. Millet and Pumpkin go so well together and with all the spices and lightly sweet coconut sugar these muffins are the perfect chilly morning with tea kind of treat.
I chose to use half almond flour and half prepared gluten free flour mix but you could go all almond flour or go the other way and swap out the almond flour completely to make these nut free (omit the pumpkin seeds too then of course). Might change the baking time slightly but just keep an eye on them as they near the 25 minute mark. You could also use organic wheat flour if you wish. I use a full fat Greek goat yogurt here but you could use a dairy version or even buttermilk if you wish but do your body a favour and stay with organic and do not try to use a light yogourt. Only other ingredient detail to mention I think would be the cranberries, I only have juice sweetened cranberries in my kitchen, if you haven’t tried them yet I suggest you do, they are SO much tastier and better for you than the oiled sugar, sulphonated ones. Whole Foods carries them in bulk or every health food store should stock them. Pumpkin seeds can be purchased already toasted but to toast the millet, heat on medium high in a pan, shaking often until you hear them start to crackle and pop then remove. This recipe makes two dozen smaller muffins, filling the cups almost ¾ full but you can fill a one dozen pan to make 12 larger ones.

Oven 350 degrees
2 Muffin pans, oiled

3     large Organic Eggs
1/2  cup Coconut Oil, melted
1     cup Greek Goat Yogurt
3/4  cup Coconut Sugar
1     teaspoon Vanilla
1     can Organic Pumpkin Puree
1/2  cup Oats
1/2  cup Millet, toasted
1/2  cup Pumpkin Seeds, toasted
1/2  cup Juice Sweetened Cranberries
1     cup Almond Flour
1     cup Gluten-free Flour
2     teaspoons Baking Power
1 ½ teaspoons Baking Soda
1/2  teaspoon Sea Salt
2     teaspoons Cinnamon
1     teaspoon Ginger
1     teaspoon ground Nutmeg
1/2  teaspoons ground Cardamom

Beat Eggs with Oil, Yogourt, Coconut Sugar and Vanilla. I use a food processor but you can hand mix if you like.

Add Pumpkin, mix,

Add Oats, toasted Millet and Pumpkin Seeds, mix,

Add Cranberries, mix,

Add remaining ingredients and mix or process well.

Spoon into greased or lined muffin pan then sprinkle with coconut sugar and a few more pumpkin seeds.

Bake for approximately 25 minutes.

Smokey Cilantro Black Bean Burgers

wpid-20140820_174616.jpgMy only new Summer creation, pretty simple and I’m sure there are many various out there but I have found the key to black bean burgers is to roast your beans!  Otherwise you often get a mushy burger.  I love cilantro, lime and smokey flavours, especially off a bbq.  I used an Asian chilli paste that is thick and mild.  I think you could pick some up almost anywhere.  These burgers freeze well but do not fully thaw them before cooking or I find they will crumble.

2              cups Black Beans, cooked or from a can
1              cup Rolled Oats
1              large Egg
1              red onion, grated
1              tablespoon red chilli paste (mild type)
1              bunch fresh Cilantro, chopped
1              teaspoon ground Cumin
1              Lime, zested
1              teaspoon Smokey Paprika
1              teaspoon Pink Salt
Splash of Olive Oil

Spread the black beans out of a baking sheet and bake at 350 degrees for 10-20 minutes.  We are looking to dry them out a bit so not to have a mushy burger.  If you prepared your own beans they are likely already less moist then a canned type so this baking time depends on what you start with but use your judgement.

Pulse Oats in a food processor.  Add ¾ of the toasted beans and pulse some more.  Add a generous splash of olive oil and red onion then pulse.  Add Egg, Chilli Paste and remaining ingredients and pulse some more.

Remove from the processor and add the remaining ¼  of the toasted beans.

Form into patties and place on a baking sheet in the refrigerate for at least an hour.

Happy BBQing!

Macadamia Nut Pie – Gluten and Dairy Free

MacadamianutpieTwo months without a post! Turns out two holidays in two months makes for a happy, rested, tanned me but almost zero kitchen time. Happy to be back refreshed and eating my way again. Since I just returned from Hawaii I thought I share this healthier twist on a traditional Macadamia Nut Pie. I brought home a few bags of nuts so I think I’ll make this one again soon =) Enjoy!

Oven to 325°F
9 inch pie crust
Medium bowl:
1/2     cup Coconut Sugar
1/2     cup Coconut Syrup
3          large Organic Eggs
3          tablespoons Organic Unsalted Butter, melted
2          teaspoons Vanilla Extract
2 1/4 cups Roasted Unsalted Macadamia Nuts, chopped (reserve some to top with)

Whisk sugar, syrup, eggs, butter and vanilla in large bowl.

Fill pie crust with nuts then pour pie mixture over nuts.

Bake pie until center puffs slightly, about 55 minutes.

Serve with vegan whipped topping, or coconut ice cream and top with more chopped nuts.

Gluten-free Almond Hazelnut Biscotti

wpid-20140303_224719.jpgHere is another nut milk pulp recipe, I have always wanted to work out a gluten-free biscotti recipe and since I often have left over nut milk pulp on hand I am thrilled that I was able to make this recipe work using that.  Unfortunately I will have to get back to you on a gluten-free biscotti recipe without the left over pulp, I suspect it will work using Almond Flour too but again I’ll need to experiment.  These turned out great, can’t wait to share them, also looking forward to having one with a coffee tomorrow.  Yum!

Oven 350 degrees
Parchment paper lined baking sheet
Electric mixer
Large bowl:
2              cups Almond and Hazelnut Pulp (from making milk)
1/2         cup Sorghum Flour
1/2         cup Millet Flour
1/4         cup ground Flax
1              teaspoon Baking Powder
1/2         teaspoon Sea Salt
1/2         teaspoon Xanthan Gum
Medium bowl:
1/2         cup Coconut Sugar
1/2         cup Cane Sugar
1/2         cup Butter or Coconut Oil, room temp (I use Goat Butter)
2              Eggs
1              teaspoon Vanilla Extract
1              teaspoon Almond Extract
Zest       of one Lemon
1              cup Slivered Almonds and Chopped Hazelnuts, toasted*

*Toast the slivered almonds and chopped hazelnuts for about 10 minutes as the oven is warming

Combine all the dry ingredients in a large bowl, mix then add the nut pulp and mix again.

In a medium bowl, cream together sugars and butter/oil with an electric mixer.  Add eggs, mix, extracts and zest and mix more.

Add wet to dry and mix some more to form a heavy dough then, hand stir in the toasted nuts.

Divide dough into two pieces.  Using your parchment paper, form and roll each piece into logs almost as long as your cookie sheet. Transfer the logs and parchment paper onto the baking sheet and arrange the rolls side by side. Gently press the rolls down ever so slightly so they are approximately 1 inch thick tall.

wpid-20140303_170845.jpgBake for 30 to 35 minutes until just golden brown. Remove from oven and allow to cool on a cutting board. When the rolls are set and cool enough to handle, carefully, with a sharp knife, slice crosswise into 1/2 inch slices.

Arrange the slices back on the baking sheet and bake at 325 degrees for an additional 10-15 minutes on each side. Slices should be lightly browned and not too moist.

Makes approximately 24 biscotti.  If they soften, crisp or reheat them in a toaster/oven before serving.

2-20 051_thumb


Hazelnut Dark Chocolate Chunk Cookies – (GF, DF, Vegan)

download (1)Having a bit of a hazelnut fest here, made a batch of hazelnut milk yesterday and will be working on a gluten-free hazelnut biscotti recipe with the pulp later this week but for now you can have this chocolately, gooey, delicious little cookie recipe inspired by a Nuttella loving little guy I worked with this weekend. Who doesn’t love the combo of chocolate and hazelnuts and I LOVE chocolate, particularly really dark chocolate.   I always have 99% Unsweetened Calbert on hand and use it to make my own chocolates, in smoothies or whatever, but, for this recipe feel free to use any chocolate you love.  Choose a quality bar and simply chop it up, the darker to better for you but I think with all the other healthy ingredients in these cookies you can afford to have the chunks be a little not so healthy 😉

Oven 350 degrees
Baking sheet lined with parchment paper

Medium Bowl

1              tablespoon Ground Flax OR Ground Chia mixed with 3 tablespoons water
1/4         cup Coconut Oil
1/4         cup Hazelnut Butter
1/3         cup Coconut Sugar
1/3         cup Cane Sugar
2              teaspoons Vanilla Extract
Use a hand blender to mix well then add dry:
1.5          cups Gluten-free Oat Flour
3              tablespoons Cocoa Powder
1/2         teaspoon Baking Soda
1/2         teaspoon Baking Powder
1/2         teaspoon Sea Salt
1-2          teaspoons Hazelnut, Almond or other non-dairy Milk
1/2         cup Dark Chocolate, chopped
1/2         cup Hazelnuts, lightly roasted, skins rubbed off and chopped
1/4         cup Raw Cacoa Pieces *optional

First mix together ground flax or chia (this is your egg replacer) and water and set aside for 5 minutes.  Then, add the rest of the wet ingredients and with a hand mixer, mix until smooth.

Add dry ingredients.  Mix again.  Add milk just to moisten up a bit if necessary. The dough is sticky, much like a peanut butter cookie.

Add chopped chocolate, roasted, skin removed, chopped hazelnuts and raw cacoa pieces if using and then use a wooden spoon to incorporate.

Divide into 12 batter balls, shape and slightly flatten with a spoon.  Sprinkle with coarse sea salt then bake for 12-15 minutes.

Cool on a rack.wpid-20140302_082651.jpg

Maca

macaMaca Root is a nutritionally dense super-food that contains high amounts of minerals, vitamins, enzymes and all of the essential amino acids. It is rich in B-vitamins, which are the energy vitamins, and is a vegetarian source of B-12.

Maca is rich in bioavailable dietary minerals calcium and potassium (with low content of sodium), and contains the essential trace elements iron, iodine, copper, manganese, and zinc as well as fatty acids including linolenic acid, palmitic acid, and oleic acids, and 19 amino acids.

Maca is used for  enhancing energy, stamina, athletic performance and memory. It has been said to help balance our hormones and due to an overabundance of environmental estrogens, most people’s hormones are a bit out of whack.  Maca stimulates and nourishes the hypothalamus and pituitary glands which are the “master glands” of the body. These glands actually regulate the other glands, so when in balance they can bring balance to the adrenal, thyroid, pancreas, ovarian and testicular glands. Instead of providing hormones to the body, maca works as an adaptogen which means that it responds to different bodies’ needs individually. If you’re producing too much of a particular hormone, maca will help regulate the production downward. However, if you’re producing too little, it’ll regulate the production upward. Hormones regulate many things in the body including mood, growth, sexual development, and tissue function. Hormones also play a role in many diseases, like cancer and depression. Maca root has been shown to be beneficial for all sorts of hormonal problems including PMS, menopause, and hot flashes.  It has been reported to have aphrodisiac properties, be a fertility enhancer and is best known for improving libido and sexual function in men and women.

Maca is an exceptionally hardy root plant native to the Andean mountain plateaus of Peru. A member of the brassica family, maca is grown at altitudes of 14,000 feet in poor volcanic soil and an extreme climate of freezing cold, fierce winds and intense sunlight, where no other crops can survive. Herbalists believe that resilient plants are especially valuable; from an herbological perspective, maca’s resiliency knows no equal. Ancient, native Peruvians used maca for thousands of years as both a food and a tonic. They believed maca increased energy and stamina, improved fertility and enhanced libido.

Maca hypocotyls may be gold or cream, red, purple, blue, black, or green. Each is considered a genetically unique variety, as seeds of the parent plants grow to have roots of the same color. Recently, specific phenotypes (in maca, ‘phenotype’ pertains mainly to root color) have been propagated exclusively to ascertain their different nutritional and therapeutic properties.  Cream coloured roots are the most widely grown and are favoured in Peru for their enhanced sweetness and size.

Darker coloured maca roots (red, purple, black) contain significant amounts of natural iodine that may avoid the growth of goiters resulting from consumption of the lighter coloured maca. Black maca is considered the strongest in energy and stamina-promoting properties, being both sweet and slightly bitter in taste. Red maca is becoming popular with many people, and has been clinically shown to reduce prostate size in rats.

The nutritional value of dried maca root is high, similar to cereal grains such as rice and wheat. The average composition is 60-75% carbohydrates, 10-14% protein, 8.5% dietary fiber, and 2.2% fats.  In addition to sugars and proteins, maca contains uridine, malic acid, and its benzoyl derivative.

MacaX6Powder-1000pxBuy only certified organic Maca Root and read the label – high protein count is a great indicator of optimal growing conditions and careful processing.  Maca root is a food, for it to be effective and to achieve results, proper dosages should be followed. In keeping with original ancestral Peruvian dosages, you should mix 3/4 to 1 teaspoon of Maca into smoothies, yogurt, herbal teas, fruit juices, etc.maca-root-powder Or if you are using our MACA POWER& Vegetarian Capsules take 2 to 6 500mg Capsules per day or as directed by your health practitioner.  It is best store Maca Root Powder in dark dry cupboard. Some people store it in the refrigerator but this is not necessary but some feel it keeps the powder fresh and the consistency lighter.